How to Create GMAT Panels
- Deepa Chavali
- Steven Hughes
Introduction
GMAT Panels and dialogs are the main interface element for viewing and modifying GMAT resources and commands in the GMAT GUI. Out of the box, GMAT provides robust panel support for resources and limited panel support for commands. However, you may decide you need more support than is provided in the default GMAT panel support and need to create a special purpose GMAT panel or dialog. This tutorial will help you create a panel for inclusion into GMAT.
GMAT uses wxWidgets for creating its cross-platform GUI. This document addresses GMAT-specific needs for adding your panel or dialog to the GMAT application. Please see http://www.wxWidgets.org for more information about wxWidgets and how to create and use their controls.
Note that currently, if you create a new panel or dialog, GMAT requires you to add the panel to your version of the GMAT source. Obviously, this is not ideal. There is planned support in the future for being able to provide your customized panel through the plug-in interface.
Default Support
The first step in creating a panel is determining if you actually need to create the panel. GMAT's out-of-the-box support for GUI panels may be sufficient for your needs. The following two sections describe the out of the box support for resources and commands.
Resources
For every resource without a special-purpose panel, the GMAT GUI creates a panel by inspecting the resource's parameters. The GmatBaseSetupPanel class inspects the object, and for every visible, non-read only parameter of the object, retrieves its type, label and unit, and creates the appropriate control, or widget, for the parameter. The control created for the parameter depends on its type (GetParameterType) and possibly its parameter object type (GetPropertyObjectType). Table 1 lists the controls created for each type.
Table 1 : Controls Created by Parameter Type
Parameter Type | Parameter Object Type | Control | Notes |
Boolean |
| Check Box | Text of Check box is Parameter Label |
Enumeration (ENUMERATION_TYPE) |
| Combo Box | The combo box is filled with the contents returned by GetPropertyEnumStrings |
Filename (FILENAME_TYPE) |
| Edit Box | A button to display a file browser is also created |
Integer (INTEGER_TYPE) |
| Edit Box | Only numeric characters are allowed |
Object (OBJECT_TYPE) | Space Point (SPACE_POINT) | Space Point Combo Box | Contents of the combo box are managed by GMAT. As objects of this type are added and removed, the combo box is automatically updated |
Object (OBJECT_TYPE) | Celestial Body (CELESTIAL_BODY) | Celestial Body Combo Box | Contents of the combo box are managed by GMAT. As objects of this type are added and removed, the combo box is automatically updated |
Object (OBJECT_TYPE) | Spacecraft (SPACECRAFT) | Spacecraft Combo Box | Contents of the combo box are managed by GMAT. As objects of this type are added and removed, the combo box is automatically updated |
Object (OBJECT_TYPE) | Coordinate System (COORDINATE_SYSTEM) | Coordinate System Combo Box | Contents of the combo box are managed by GMAT. As objects of this type are added and removed, the combo box is automatically updated |
Object (OBJECT_TYPE) | Antenna (ANTENNA) | Antenna Combo Box | Contents of the combo box are managed by GMAT. As objects of this type are added and removed, the combo box is automatically updated |
Object (OBJECT_TYPE) | Sensor (SENSOR) | Sensor Combo Box | Contents of the combo box are managed by GMAT. As objects of this type are added and removed, the combo box is automatically updated |
Object (OBJECT_TYPE) | DEFAULT | Combo Box | The combo box is filled with a list of objects of the Parameter Object type. Note that GMAT does not update the contents of this combo box as new objects are created or deleted |
Object Array Type (OBJECTARRAY_TYPE) | Space Point (SPACE_POINT) | Space Point Check List box | Contents of the list box are managed by GMAT. As objects of this type are added and removed, the list box is automatically updated |
Object Array Type (OBJECTARRAY_TYPE) | DEFAULT | Check List Box | The list box is filled with a list of objects for all of the parameter types in the array. Note that GMAT does not update the contents of this combo box as new objects are created or deleted |
On/Off (ON_OFF_TYPE) |
| Combo Box | Combo box with "On" and "Off" as the only selections |
Real (REAL_TYPE) |
| Edit Box | Only numeric characters are allowed |
String (STRING_TYPE) |
| Edit Box |
|
Figure 1 : Default FuelTank Panel
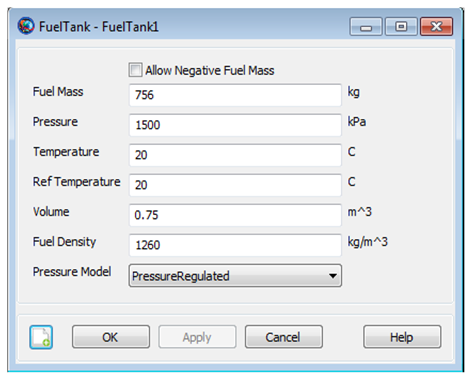
GMAT also creates labels and units for each parameter based on the values (GetParameterText and GetParameterUnits) returned by the object. The parameter's text is converted to a title case representation for the label. Finally, every panel will include Show Script, OK, Apply, Cancel, and Help buttons. Note that the help page displayed is configured in the Gmat.ini file. See Figure 1 for an example of the default panel GMAT creates for the FuelTank resource object.
Figure 2 : INI Configured FuelTank Panel 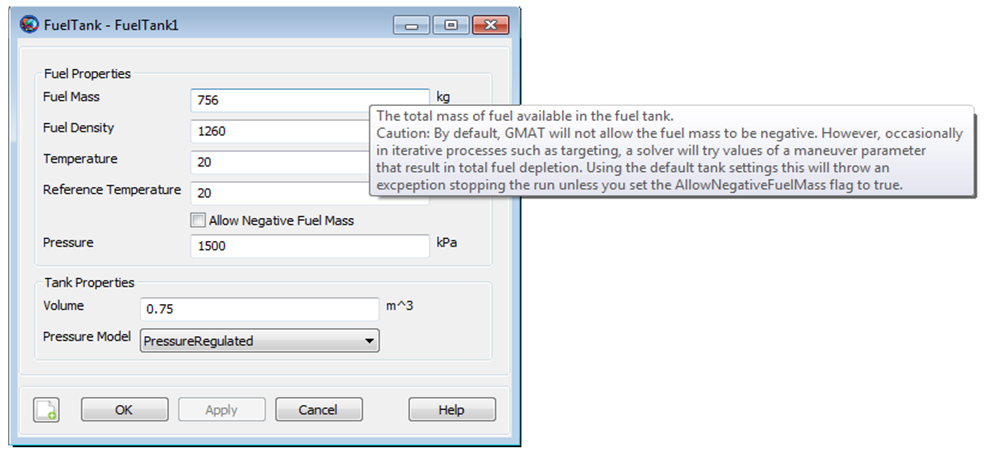
GMAT also allows you to configure these default panels based on the contents of an INI file. GMAT looks for an INI file with the same name as the object type in the \data\gui_config directory. This INI file can be used to change ordering, group parameters, change labels, add hints and more. For example, Figure 2 shows the INI configured version of the panel GMAT creates for the FuelTank object. To create this panel, we created the following \data\gui_config\FuelTank.ini file:
[MAIN]

[Tank Properties]
 Type=Vertical
 Label=Tank Properties

 [Fuel Properties]
 Type=Vertical
 Label=Fuel Properties
 Position Before=Tank Properties

 [FuelMass]
 Hint=The total mass of fuel available in the fuel tank.\nCaution: [...]
 Label=F&uel Mass
 Parent=Fuel Properties

 [FuelDensity]
 Label=Fuel Density
 Parent=Fuel Properties
 Position Before=Temperature
 Hint=The density of the fuel.

 [Temperature]
 Parent=Fuel Properties
 Hint=The temperature of the fuel and ullage in the tank. \nGMAT [...]

 [RefTemperature]
 Label=Reference Temperature
 Parent=Fuel Properties
 Hint=The temperature of the tank when fuel was loaded.

 [AllowNegativeFuelMass]
 Parent=Fuel Properties
 Label=Allow &Negative Fuel Mass
 Position Before=FuelDensity
 Hint=This field allows the fuel tank to have negagive fuel mass [...]

 [Pressure]
 Parent=Fuel Properties
 Position Before=
 Hint=The pressure in the tank

 [Volume]
 Parent=Tank Properties
 Hint=The volume of the tank. GMAT checks to ensure that the volume [...]

 [PressureModel]
 Parent=Tank Properties
 Hint=The pressure model describes how pressure in the tank changes [...]
The [FuelMass], [FuelDensity], [Temperature], etc sections define the appearance of a particular object parameter and its position in the panel. The [Tank Properties] and [Fuel Properties] define the group boxes in the panel. See the Plugin Walkthrough documentation for more information about creating and using INI files.
Commands
Figure 3 : Default Command Panel
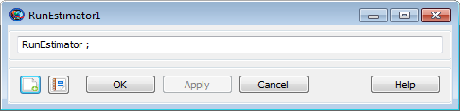
For every command without a special-purpose panel, the GMAT GUI creates a simple panel for editing the inputs to the command. The panel consists of an edit box for the command. Every panel will also include Command Summary, Show Script, OK, Apply, Cancel, and Help buttons. Note that the help page displayed is configured in the Gmat.ini file. See Figure 3 for an example of the default panel GMAT creates for the RunEstimator command object.
The Panel Hierarchy
If the default GMAT behavior is not enough for your object, you need to create a custom panel class. Your panel class should be derived from from the GmatPanel or GmatDialog class. The two classes are functionality equivalent. The GmatDialog class is for modal dialogs, i.e., panels that block any other input until they are closed. If possible, you should use the GmatPanel class as non-modal dialogs are much friendlier for your users. The GMAT GUI has very few modal dialogs. The most obvious modal dialog panels are the ones used to create variables, arrays, and strings, and to create new Coordinate Systems.
Creating your Panel Class
To create your new panel class, derive your class from GmatPanel or GmatDialog. We suggest that you follow the class naming convention specified in the GMAT coding style guide for new panels and dialogs. All panel names should end with Panel and dialog names should end with Dialog. For your new panel class, there are 6 important steps:
- Define your wxWidgets Event Table and ID enumerations
- Override the constructor to save a reference to the object being modified and create any other objects you need. Your constructor's method signature should include the object to modify.
- Override the Create method to create your GUI controls and widgets
- Override the Load method to populate the controls from the object
- Override the Save method to store the values from the controls into your object
- Override the destructor to free memory for any objects created by your panel.
Note that if you need to use your object to provide some feedback to the users (for example, converting coordinate systems), it is a good idea to clone your object and use that clone so that the unedited object is preserved. Then when the Save method is called, the clone should be used to modify the original object.
wxWidgets Event Table
An important part of your class implementation is the wxWidgets Event Table. GMAT uses wxWidgets for its GUI controls. An event table such as the one below tells wxWidgets how to map events to member functions. It should be defined in the implementation file (.cpp).
BEGIN_EVENT_TABLE(MyPanel, GmatPanel)
EVT_BUTTON(ID_BUTTON, MyPanel::OnButton1)
EVT_LISTBOX(ID_LISTBOX, MyPanel::OnSelect1)
END_EVENT_TABLE()
The above event table tells wxWidgets, when it receives a button click event for any control using the ID_BUTTON enumeration in MyPanel, to call the OnButton1 member function. The BEGIN_EVENT_TABLE macro declares that MyPanel, which is derived from GmatPanel, owns this event table.
The member function that handles an event does not have to be virtual. In fact, the event handler ignores the virtual declaration. These functions have a similar form: the return type is void and they receive an event parameter. The type of this parameter depends on the event. For size events, wxSizeEvent is used. For menu commands and most control commands (e.g. a button), wxCommandEvent is used. When controls get more complicated, they use their own event class.
In order for the compiler to know that your panel has an event table, you must place the DECLARE_EVENT_TABLE macro in the class definition in your header file:
class MyPanel : public GmatPanel
{
[...]
private
DECLARE_EVENT_TABLE()
enum
{
ID_BUTTON = 9300,
ID_LISTBOX,
ID_EDIT
}
}
Please see http://www.wxWidgets.org for more information about wxWidgets and how to create and use their controls.
Methods
Constructor/Destructor Methods
The constructor is where your panel is created and associated with its object. Usually, in the constructor you will save a reference to the object (for later use by the LoadData and SaveData methods), optionally clone it, and create any other objects you need.
At the end of the constructor, you should call the Create and Show methods.
Create Method
The Create method is where you create and initialize all of your GUI controls, or widgets. Note that the widgets are not populated from this method; the LoadData method will be called automatically and should be the only place you copy object data to the controls.
Design your GUI panel to guide the user and provide immediate feedback as changes are made. While the SaveData method validates all inputs as they are set in the object, it is only called when the OK or Apply button is clicked.
For example, if a parameter only accepts a small set of strings, don't use an edit box (wxTextCtrl) for input. Use a combo box instead that shows the user to select only allowable strings. Similarly, if a parameter only accepts numeric input, create an edit box and pass in a wxTextValidator(wxGMAT_FILTER_NUMERIC) to filter out all non-numeric characters. (Note that the wxGMAT_FILTER_NUMERIC is a macro defined in gmatwxdefs.h that is defined to be correct for the current platform.
Also, pay attention to the "flow" of your panel. Group connected parameters inside group boxes (use the GmatStaticBoxSizer if possible as it has been designed for multi-platform use inside GMAT). Make sure the tab order is correct. Use labels, with accelerator keys (the GUI_ACCEL_KEY is defined for you in gmatwxdefs.h), to quickly access controls.
Please look at the source code for examples and refer to http://www.wxWidgets.org for more information.
LoadData Method
Override the LoadData method to populate your controls from your object. You should not raise exceptions from this method. Surround your code with a try-catch block and send any errors to the MessageInterface::ShowMessage method or MessageInterface::PopupMessage method.
SaveData Method
Override the SaveData method to copy changed data from the GUI widgets back to your object (not the cloned object). The SaveData method is called automatically for you when the user modifies the panel and clicks the OK or Apply button. It is ONLY called when the user clicks these buttons and you have called EnableUpdate(true) to signal the panel that something has changed on the panel.
Validate the user's input as you save it back to the object. The UserInputValidator class provides many methods for validating input, such as CheckReal, IsValidName, CheckFileName, etc. Use these methods to validate input and set the CanClose field as appropriate. Set the canClose field to true if there were no errors and the panel may be closed if the OK button was clicked. If there were errors, set canClose to false.
Finally, call EnableUpdate(false) at the end of the method to signal to the panel that the controls and the object are back in sync.
Note that for commands, the GuiInterpreter->ValidateCommand() method must be called after successfully saving new data to the command object in order to create element wrappers if wrappers are used in the command. It is also recommended that you implement the Validate() method in the new command object so that theCommand->Validate() method can be called to validate user input.
EnableUpdate Method
Call the EnableUpdate method to signal to the panel that something on the panel has been changed by the user and the controls or widgets are now out of sync with the object. By calling EnableUpdate(true), the Apply button becomes enabled and the SaveData method will be called when the OK or Apply button is clicked. By calling EnableUpdate(false), the Apply button is disabled and the SaveData() method will not be called when the panel closes.
Calling your Panel at run-time
Note that for plug-in resources and commands, and for objects where you want to use the default GUI panels, nothing else needs to be done and you should ignore this section. For plug-in resources and commands, there are USER_DEFINED_OBJECT and OTHER_COMMAND enumerated values defined in GMAT's ItemType enumeration, so they will be handled automatically. For a plug-in resource, GMAT will automatically use a GmatBaseSetupPanel to bring up the panel since the item type is USER_DEFINED_OBJECT. For a plug-in command, it will automatically use a GmatCommandPanel to bring up the panel since the item type is OTHER_COMMAND.
The final step in creating a new panel is to integrate it into GMAT. This not only means adding it to the project, but also adding the code that will create the panel at run-time.
There are 5 steps for adding your object and its panel:
- Add your object (resource or command) to the GMAT base project
- Add your panel to the GMAT GUI project
- Define the ItemType in GmatTreeItemData.hpp
- Modify GmatMainFrame::CreateNewResource or GmatMainFrame::CreateNewCommand methods to create your panel when that item type is selected and pass in the object to modify
- Add the new object type and GUI item type mapping to GetObjectType() and GetItemTypeAndIcon().
For both resource and command objects, you need to define the object's ItemType in the GmatTreeItemData.hpp. Add a new enumerated value into ItemType for your resource (near the top) or command (near the bottom). You should also add an enumerated value to the MissionIconType or ResourceIconType enumerations.
Once you have completed these steps, your new panel should be integrated into GMAT and ready for use.