CMake on Windows, Linux, and MacOS X Operating Systems
...
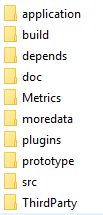
The first two three steps are generally "one-time" processes and result in a build system (e.g. Visual Studio solution or makefiles) that will intelligently rebuild GMAT components as needed when source or configuration files are changed. NOTE: These instructions refer to <GMAT> as the top-level GMAT repository folder.
Figure 1. The <GMAT> repository layout
Step 1: Clone the GMAT Git Repositories
...
GMAT is distributed with a Python script to configure most (but not all) dependencies. Table 1 describes all software dependencies for GMAT. The <GMAT>/depends folder contains scripts to automatically download and configure the core GMAT dependencies. Note, to build without MATLAB or Python (or other non-Core dependencies), you can simply uncheck the plugins that require those dependencies later in the CMAKE configuration (see the "Used in GMAT" column in the table below). Core dependencies are required to build even the minimal GMAT distribution.
Table 1. GMAT DependenciesAnchor Table 1 Table 1
| Name | Version | Used in GMAT | Download |
|---|---|---|---|
| CSPICE | N0065 | Core Dependency | Configure Script |
| wxWidgets | 3.0.2 | Core Dependency | Configure Script |
| Xerces | 3.1.4 | Core Dependency | Configure Script |
| MATLAB | R2015a+ | CInterface Plugin MatlabInterface Plugin | Self-download |
| Python | 3.4, 3.5 | PythonInterface Plugin | Mac, Windows Linux (Package Manager) |
| Additional CSALT Dependencies* | |||
| boost | 1.69 | CSALT CSALTInterface Plugin | CMAKE configuration |
| SNOPT | 7.5 | CSALT | Self-download; place in |
| 2017 Intel Fortran Redistributable Libraries | Release 4 (ww_ifort_redist_msi_2017.4.120.zip) 64-bit | CSALT CSALTInterface Plugin | Self-download; Windows users only |
...
Requirements:
- Windows: Visual Studio 2013 2017 (Express or Paid versions).
- Mac: XCode tools (preferably v7+), with the command line developer tools (GCC 4.8.5 or greater)
- Linux: GCC compiler tools (GCC 4.8.5 or greater)
Figure 2. <GMAT>/depends folder layout after dependency configuration
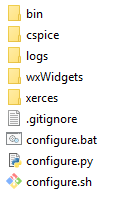
→ (For GMAT R2018a and earlier) Run the configure.sh (Mac/Linux) or configure.bat (Windows) script to set up core GMAT dependencies.
...
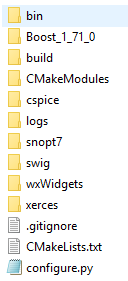
CSALT requires installation of the code and build files for two additional third-party components: Boost (code only) and SNOPT (code and libraries). The Boost code is downloaded automatically as part of the CMAKE configuration process. (See Step 3 of this guide.) The SNOPT code and libraries should be placed in a folder named snopt7. The dependency folder ("depends"), configured to include the CSALT dependencies, is shown in Figure 3. Note that some of the items in the depends folder do not appear until either (1) the configure.py script is run or (2) the CMAKE configuration process is run. (See Step 3 of this guide.)
Figure 3. <GMAT>/depends folder layout, including the folders for CSALT builds
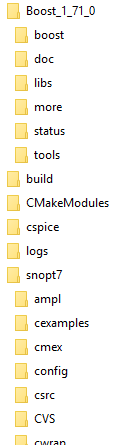
When the Boost and SNOPT folders are configured correctly, the code for the corresponding components should be directly inside of the Boost_1_71_0 and snopt7 folders, as shown in Figure 4.
Figure 4. A view showing contents of the boost and part of the snopt7 folders
SNOPT Setup
CSALT is built to use SNOPT 7.5. Civil servant members of the GMAT development team can obtain a copy of the SNOPT code from the GMAT Project lead. Subcontractors should obtain a copy from their company GMAT point of contact. Other GMAT developers should contact Stanford Business Software, Inc. (SBS) for a licensed copy of the software package. Setup for the SNOPT package is different for developers that have access to the code from the GMAT project than for developers that are using code from SBS.
...
The SNOPT source code is contained in an archive that your team lead will provide to you. Unpack that archive into your depends folder, and verify the resulting snopt7 fonder contains the file structure shown in Figure 4.
Windows, Mac, and Linux developers with access to the GMAT internal repository can find prebuilt copies of the SNOPT libraries in platform specific subfolders of the <gmatinternal>/code/CSALTPlugin/snoptlibs folder. Precompiled libraries are available there for Windows 10, Linux (built on Ubuntu) and Mac OS X (built on High Sierra). Thise libraries will need to be copied into place in the bin and debug subdirectories of the GMAT output directory that you will configure later in the build configuration. In the GMAT CMAKE settings, that directory is labeled GMAT_BUILDOUTPUT_DIRECTORY, and defaults to the <GMAT>/application folder.
Developers working on other platforms will need to build SNOPT for their enviromentsenvironments. The build procedure is described in the snopt7/INSTALL text file. Be sure to build both the SNOPT shared library and the C++ interface shared library for the target platform.
...
SBS delivers the SNOPT code in an archive file. Unpack the SNOPT 7.5 archive, snopt7.5-1.4 into the depends folder. On success, the depends folder should contain the snopt7 folder used to build CSALT. Follow the SNOPT build instructions, found in the INSTALL text file of the snopt7 folder, to create theSNOPT shared library and the SNOPT C++ interface library. Once built, the libraries snopt7 and snopt7_cpp (with platform specific file extensions) are located in the lib/.libs folder. Copy the shared libraries to the .lib folder, completing installation.
A note for Windows developers: SNOPT is coded in Fortran. You will need a Fortran compiler to build SNOPT for your workstation. The libraries built for the GMAT development team were compiled using the Intel Fortran compiler. Windows users of the CSALT libraries also install the Intel redistributable libraries as part of the GMAT/CSALT installation procedure. (See "Additional CSALT Dependencies" in Table 1.)
Step 3: Create GMAT Build System Using CMake
...
Tip: All CMake commands can also be performed on the command-line instead of using the GUI. See below for instructions.
Figure 5. Components of the CMake GUI

→ Enter values into the CMake GUI in the following order (as annotated in Figure 5):
- Enter the full path to the
<GMAT>cloned repository on your computer - Enter the full path to the folder where the GMAT build system should be placed
- CMake produces out-of-source builds. It is recommended to use
<GMAT>/build/<OS>-cmakebuildfor this value.
- CMake produces out-of-source builds. It is recommended to use
- Click "Configure"
- CMake may ask for permission to create the folder you specified in Step 2 ("Where to build the binaries")
- CMake will ask you to choose a generator (see Figure 6). See the CMake Generator webpage for an explanation of available generators.
Recommended generators are:- Mac: Unix Makefiles (although XCode has also been observed to work)
- Linux: Unix Makefiles
- Windows: Visual Studio (note e.g. "Visual Studio 12 2013" is 32-bit, whereas "Visual Studio 12 2013 x64" is 64-bit)
Figure 6. Choosing a generator in CMake

- CMake will start the configuration process, after which the Variable List and Configure Results sections (Figure 5 sections
4aand4b) will be populated:Figure 7. Output of CMake Configure

Use the Configure results output box (Figure 3 section
4a) to change variables in the CMake variable list (Figure 3 section4b) as follows:- Always start at the top of the configure results output box and correct errors one-by-one
- For each error: change the appropriate CMake variable, re-configure, confirm the error was fixed (in the results output box), then repeat for next error
In addition to errors, there are several CMake variables that allow you to control how the build system configures GMAT:
CMake Variable (Group) Description Associated CMake Error CMAKE_BUILD_TYPE (CMAKE)On makefile systems, this specifies the desired build type
On VisualStudio/XCode systems, this specifies all possible build types
Valid values:Release,Debug,RelWithDebInfo,MinSizeRel
Note: On makefile systems, you should create a separate out-of-source build folder for each desired build type (Figure 3 box2).
(e.g.cmakebuild-releaseorcmakebuild-debug)N/A CMAKE_INSTALL_PREFIX (CMAKE)Location to install GMAT when doing make install
or building the VisualStudio->INSTALLproject Note: This is autofilled to<GMAT>/GMAT-<release>-<OS>-<BitType>for convenience. Note libraries are only placed here when building AND installing. Note this directory must be different than "Where to build the binaries", and the target ofGMAT_BUILDOUTPUT_DIRECTORY.N/A CSPICE_DIR (Ungrouped)Path to CSPICE root directory
(containinginclude/,lib/, etc.)CSPICE NOT FOUND (make sure to run depends script from Step 1) F2C_DIR (Ungrouped)Path to F2C root directory
(containing f2c.h)
Note: this should generally beCSPICE_DIR/includeF2C NOT FOUND (make sure to run depends
script from Step 1)GMAT_ADDITIONAL_PLUGINS (GMAT)Full path to a text file containing locations of additional (i.e. 3rd-party) GMAT plugins. The file contents should follow the following format:
Plugin1Name = /full/path/to/Plugin1/folderPlugin2Name = ./relative/path/to/Plugin2/folderWhere the plugin name is whatever you want (usually the plugin's common name) and relative paths are with respect to the file location.N/A GMAT_BUILDOUTPUT_DIRECTORY (GMAT)Location to place libraries and executables when building but NOT installing. Note this directory must be different than "Where to build the binaries", and the target of CMAKE_INSTALL_PREFIX.GMAT_PROPRIETARYPLUGINS_PATH(GMAT)Full path to the top-level GMAT Proprietary Plugins
code/folder.(folder that contains CMakeLists.txt) This will be automatically found if you name it
gmatinternal-gitand place it next to the main<GMAT>repository folder.N/A Matlab_ROOT_DIR (Matlab)Path to MATLAB root directory
(on Mac, this is the path to MATLAB_R20xxx.app)Matlab NOT FOUND (make sure MATLAB
is installed)PLUGIN_XXX (PLUGIN)Whether to build a particular GMAT Plugin
Note: the proprietary plugins only show up here ifGMAT_PROPRIETARY_PLUGINShas been correctly set
Note: additional (external) plugins only show up here ofGMAT_ADDITIONAL_PLUGINShas been correctly setN/A wxWidgets_ROOT_DIR (wxWidgets)Mac/Linux: Path to wxWidgets wx-configutility
(usually this is the wxWidgetsbin/folder)
Windows: Path to wxWidgets
(containinginclude/andlib/)wxWidgets NOT FOUND (make sure to run depends script from Step 1) PYTHON_LIBRARY (PYTHON) (Advanced Variable)Use a specific installation of Python for GMAT's PythonInterface plugin. If this variable is blank, the latest version of Python that can be found in default locations will be used. Set this to the FULL PATH to pythonXX.lib (e.g. C:/path/to/python35.lib) if you installed Python to a custom location. Python NOT FOUND (make sure Python is installed, and variable is set properly) XercesC_INCLUDE_DIRXercesC_LIBRARY (Xerces)Xerces library and include folder locations. Failed to find XercesC (make sure to run depends script from Step 1)
When all CMake errors are handled and you have specified all desired GMAT options, click "Generate".
CMake will create the build system in the chosen out-of-source build folder (Figure 3 box 2).
...
Beginning with the beta leading to GMAT R2019a, builds for the Collocation Stand Alone Library and Toolkit (CSALT) are incorporated into the GMAT build system. The CSALT dependencies are included in the list of dependencies above. CSALT users setup set up the build system by following these additional steps:
...
The CSALT build is controlled by a checkbox checkboxes on the CMake GUI in the Ungrouped Entries section if CSALT has not been built before, or in the CSALT GMAT section if it has been built. The CSALT build toggle is labeled CSALTGMAT_INCLUDE_CSALT_IN_BUILD:

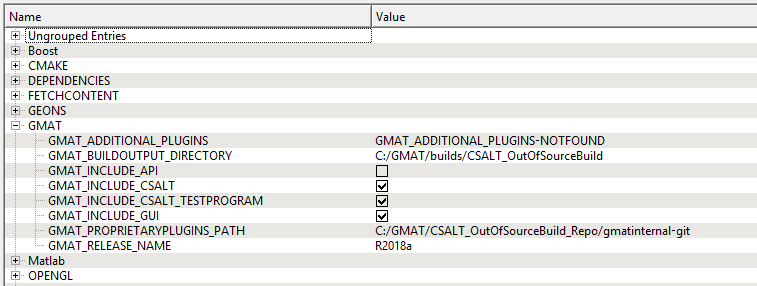
When you activate the CSALT build setting and configure the CMake build again, another CSALT setting, CSALTGMAT_BUILDINCLUDE_TESTCSALT_PROGRAMTESTPROGRAM, will be added to the Ungrouped Entries group. This switch controls builds of the CSALT test program. The next time (and all subsequent times) that the CMake GUI configure button is toggled, the CSALT settings will be grouped together: , as in the image above.
The GMAT CSALT interface is part of the GMAT internal repository. Users with access to that repository can build the GMAT interface plugins for CSALT (PLUGIN_PROPRIETARY_CSALT) and the EMTG spacecraft models (PLUGIN_PROPRIETARY_EMTG_MODELS).
Activating the CSALT build switches turns on the corresponding build settings, producing the CSALT. Installing the resulting build includes installation of the SNOPT and CSALT libraries and the CSALT test executable (if selected to build). The GMAT interfaces can be activated by adding the PLUGIN entries for the build CSALT libraries in the GMAT startup file.
...
- Open the
GMAT.slnVisual Studio solution. After loading, you should see the following projects:Figure 8. CMake-generated VisualStudio2013 Solution

NOTE: This list may vary according to the GMAT plugins you chose in Step 2.
The common projects you will see are:ALL_BUILD: The default startup project. Ensures that all other projects are up-to-date, then builds them.ZERO_CHECK: Performs the work to ensure all other projects are up-to-date. It is automatically built along with all other projects.INSTALL: Creates a standalone GMAT folder containing all executables, plugins, data files, samples, and documentation.GmatBase,GmatConsole,GmatGUI, Plugins: The various GMAT components. You can build these individually if desired.
- Choose a build configuration, e.g.
Release,Debug, etc. - Build the
ALL_BUILDproject. Depending on your system speed and number of selected GMAT components, this may take a while! - (Optional) Build the
INSTALLproject if you want a fully standalone and relocatable version of GMAT.
...
wxWidgets v3.0.2 has a known bug (documented here) on Mac OSX 10.10+ that causes a build error. As of R2016a, the GMAT dependency configuration script (THIS IS NO LONGER AN ISSUE since switching to wxWidgets 3.0.4.configure.sh) implements this fix internally, so GMAT users do not need to take any additional action for wxWidgets to build on Mac.
Including the OpenFramesInterface 3D Visualization Plugin
...